Tips to Paint a Room Fast and Easy
If you are looking for tips on how to paint a room quickly, don't miss this! Painting a room doesn't have to be tedious. I am sharing my favorite tips and tricks for how to paint any room fast!

The easiest way to give a room a whole new life is to paint it.
But it can also feel daunting.
The good news is – it doesn't have to be!
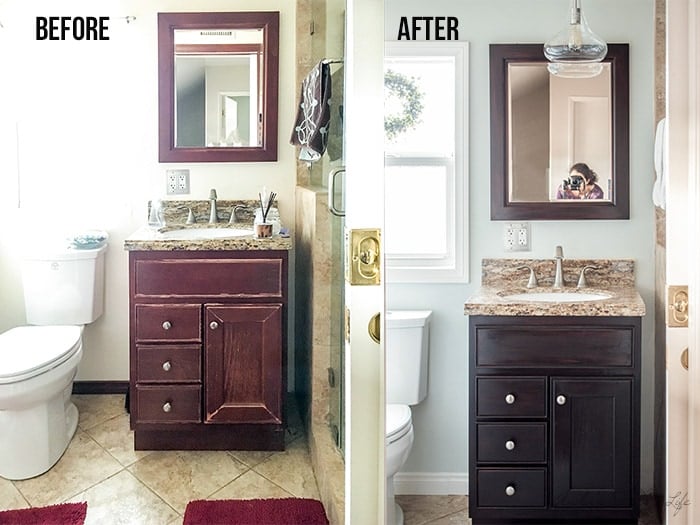
When I gave my guest bathroom a makeover, the quickest impact was from changing the color from a boring yellow-white to a cool blue-green.
The best part – it took about an hour TOTAL.
Yes that's right!
And that is including cutting in, painting AND clean up.
The clean up there took about 20 minutes and the prep took about 10 minutes… Each coat took about 15 minutes – so totally, 30 minutes of painting!
Not bad at all!
Yes, it is a fairly small bathroom.
Larger rooms are pretty quick too.
I have painted three walls of my bedroom in about 90 minutes!
Let's get into all the details of how you can paint a room fast and easy.
**This post is sponsored by HomeRight. All ideas and opinions are my own. Thank you for supporting the brands that make it possible to bring you new projects.**
***This post contains referral or affiliate links. It is a way for this site to earn advertising fees by advertising or linking to certain products and/or services. Please read my full disclosure here ***
Preparing the room
The first step is always prep work.
It is the most important too!
Here are the most important steps. They might change based on your unique situations but for the most part, here are the basics –
- Remove any outlet covers and other wall art, nails etc.
You could paint around them but you will never get that clean seamless look.
2. Patch it up
Fill in any holes in the wall using drywall putty and sand smooth with a drywall sponge.

3. Clean the walls
Wipe down the walls with wet wipes or a wet rag to remove old dirt and grime and also the dust from sanding the drywall compound.

If you are going lower in sheen – like from a semigloss to eggshell, you need to wipe down the wall with a TSP solution.
4. Tape
Tape and cover any outlets or unremovable fixtures. Also, tape baseboards to not only protect them from paint splatters but also to get a clean sharp line.
5. Cover the floor
When you paint, there are always tiny splatters of paint flying everywhere… no matter how careful you are.
My new favorite is this applicator that applies tape to the plastic sheet as you apply it to the floor/baseboard. So easy and quick.
6. Stir the paint well.
If the paint has been sitting for any more than an hour after getting it mixed at the store, make sure to stir it really well with a paint stick.
How to paint
If you are going from a dark to light color, a couple coats of primer may be needed. applying primer and paint follow the same procedure as below.
In the bathroom, I was going from a light to darker color so I didn't bother with primer.
I decided to go with Sherwin Williams Sea Salt at 50% pigment.
Yes, you can have the paint stores modify the colors for you.
The adjacent guest room uses Sea Salt and when I tried it in the bathroom it felt too dark for the tiny room.
The custom color of Sea Salt is just the perfect shade!
To paint, I used two products that made the entire process super easy and quick.
STEP 1: CUT IN THE EDGES
Notice I didn't say tape the edges.
I am using the HomeRight Quick Painter to cut in along the edges!
It is super easy to use! Just fill the handle with paint by dipping the nozzle into the paint and pulling back the yellow handle.

Saturate the pad with the paint and just swipe it along the edges.
It really is that simple!
There is a little guide on the side that keeps the pad aligned to the edge of the wall and the ceiling or the adjoining wall and creates a straight line.

I found that if I kept a constant amount of paint on the pad without oversaturating it, it worked perfectly!
If I squeezed the handle too hard or pressed the pad too much, paint seeped out the sides.
Once you get into the rhythm it is very straightforward. One of my favorite things about the quick painter is that it is so easy to get it into tight spots – especially in a bathroom where there are hard to reach areas like behind the toilet and the very narrow space between the vanity and the shower. There is no way I could have painted that with a brush!
I also used the quick painter to paint my concrete patio.
STEP 2: ROLL THE PAINT
This is the fun part!
I love love the EZ-Twist PaintStick.
You might remember it from when I painted the kids' room ceiling after removing the popcorn texture.
It holds paint in the handle and feeds the roller so you don't have to refill your roller with paint every few minutes.

Just clip on the nozzle to the edge of the paint can and use the port to fill the handle with paint!

Once you start rolling, it takes a little while for the paint to saturate the roller. So, give it a few rolls and twists till you start getting a constant amount of paint. Once it starts rolling paint smoothly, it is quick and easy to finish painting the entire wall without having to reload paint into the roller.

Just roll, roll, roll, twist, roll, roll, roll…
Guess how many times I had to refill while painting this small bathroom – ZERO!
In fact, I had a little bit of paint left in the end that I had to push back into the can.
You don't have to worry about holding a paint tray in hand.
STEP 3: PAINT A SECOND COAT
I found that the paint was ready to be recoated in about an hour. I just left the tools loaded with paint while I waited. If you are waiting longer than that, you should wrap them up in plastic wrap to keep them from drying out.
STEP 4: CLEAN UP!
To clean up both the Quick Painter and EZ-Twist Paintstick, I filled a bucket with water and filled and rinsed out the nozzles and handles until the water ran clear.
It really is as easy and quick as it sounds!
The paint edges are very nice and clear. Can you believe I got these without taping!

The only one place I had to break out a paintbrush for was the space between the A/C vent and the door trim which is about 2 inches wide and too narrow for the Quick Painter to fit through. Whenever I have to use a brush, I always use this one.
Frequently asked questions
How does the PaintStick compare to a roller?
The PaintStick is a bit heavier than a regular paint roller on an extension pole but it sure wins over the need to keep going back to refill the roller from a tray – or trying to balance a tray in your other hand as you paint the walls.
Is it a hassle to clean out everything?
It does take a little time to clean up the Quick Painter and the Paintstick. However, I think that is a very tiny fraction of the time compared to the time it saves in cutting in by hand and painting the wall.
Overall, painting the little bathroom was not long at all. It was so much easier to paint all the nooks and crannies of the little bathroom quickly using the Quick Painter and the EZ-Twist PaintStick!
Source: https://www.anikasdiylife.com/paint-room-quickly-tips-tricks/
0 Response to "Tips to Paint a Room Fast and Easy"
Post a Comment